Hubby and I hardly eat meesuah as we are not a fan of it. I remembered the last time we ate it was during my confinement month when the confinement lady would cook that for us as breakfast. I once cooked some for Jayden when he was ill, but he didn’t like it either. So the left over packet of meesuah has been lying in the fridge since then.
Recently a dear friend of mine, Ling Nee, shared this homemade recipe with me and I’ve tried it during the weekend with slight modification (the BB’s (my nickname among whatsapps group) way!). Hubby finished the whole bowl and even drank up the last drop of soup. So I thought I must share this great idea with you all, especially those who dislike meesuah-just like me!
Preparation: 5 minutes
Cooking time: 30-40 minutes (including preparing the soup base)
Ingredient:-
Meesuah
Anchovies
Few slices of ginger
Minced meat
Few drops of sesame oil
Xiao Xin rice wine
Green vegetables
Instruction:-
1. To cook the soup base, put the anchovies and sliced ginger into a pot of water and boil it for at 15-20 minutes(or longer if you have time)
2. Discard the anchovies from the soup base
3. Add the minced meat into the soup to cook
4. Add in meesuah when the meat is ½ cooked
5. Drizzle some sesame oil and Xiao Xin rice wine(or any rice wine)into the soup
6. Add in some green vegetables of your choice and cook for few second just before serving (don’t overcook the vegetables as you will spoil its nutrients)
7. Add some pepper to taste + spring onions(optional- I cooked mine without these items)
8. A hot nice and warmly bowl of homemade meesuah is ready to be served!
Lilypie Second Birthday tickers


Showing posts with label Baking And Cooking. Show all posts
Showing posts with label Baking And Cooking. Show all posts
Saturday, May 4, 2013

Thursday, May 2, 2013
Flower Pasta

When you are out of idea on what to cook or fed up of cooking for your little ones, how about trying this simple idea?
Recipe:
Cooked baby pasta
Variety of colourful vegetables and fruits which you can find in your fridge
Cooking time: 5 minutes

Result: a happy-tummy-full baby and a satisfied mummy!

Wednesday, May 1, 2013
Toddler Food Ideas
When you have a fussy or picky eater at home, why not try this simple meal. These are some of the meals which I've prepared for Jayden.
You can also find other toddler cooking in my previous blog entry. Happy trying!!


You can also find other toddler cooking in my previous blog entry. Happy trying!!

'Happy face' rice & quinoa cereal
Mouth: Grapes
Eye: bananas and organic baby cereal puff

Yogurt with banana and sprinklers
Sunday, April 28, 2013
Stir Fried Spaghetti The Toddler Way
Tried and tested this self- creation. Jayden finished a whole bowl( or shall I say 3/4 of it as I serve him a really large adult portion)!
Ingredient:
Finely slices meat
Shredded purple cabbage( or any other vegetables that is available in your fridge)
1 egg
Spaghetti
Pinch of soya sauce( optional- which I would highly recommend you omit this especially for younger toddlers)
Direction:
1. Cook the pasta until soft enough for your little ones to consume( not al Dante as toddlers may find it too hard to chew/ swallow)
2. Drain the pasta
3. Stir fry the meat in a pan, then add in the vegetables until tender
4. Add in the pasta and mix well
5. Crack an egg over the pasta and continue to stir fry until eggs are fully cooked( I don't serve raw or semi cooked eggs for my little boy as this is not good for their digestion system)
6. Viola! A nice hot and fresh stir fried spaghetti is ready !!!
Ingredient:
Finely slices meat
Shredded purple cabbage( or any other vegetables that is available in your fridge)
1 egg
Spaghetti
Pinch of soya sauce( optional- which I would highly recommend you omit this especially for younger toddlers)
Direction:
1. Cook the pasta until soft enough for your little ones to consume( not al Dante as toddlers may find it too hard to chew/ swallow)
2. Drain the pasta
3. Stir fry the meat in a pan, then add in the vegetables until tender
4. Add in the pasta and mix well
5. Crack an egg over the pasta and continue to stir fry until eggs are fully cooked( I don't serve raw or semi cooked eggs for my little boy as this is not good for their digestion system)
6. Viola! A nice hot and fresh stir fried spaghetti is ready !!!
Saturday, April 27, 2013
Car-car pasta
What's cooking for tonite? Yes!! It's car-car pasta time!! Jayden enjoyed it so much and wallop da whole bowl! You can try this at home too!

Recipe:
Cooked pasta
Steamed vegetables( carrot, sweet corn and pea sprout)
Grapes


Cooked pasta
Steamed vegetables( carrot, sweet corn and pea sprout)
Grapes


Monday, December 24, 2012
Santa Clause Is Coming To Town
Ho ho ho! Santa clause is coming to town....Getting ready for tomorrow Christmas party at home.


My DIY party decorations.

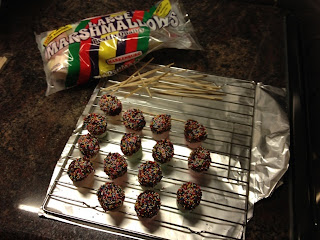
My homemade chocolate dipped marshmallow, specially prepared for the kids.
Tuesday, May 22, 2012
Baby's Sugar Free Dessert - Banana and Apple Bread Pudding

Banana and Apple Bread Pudding
This recipe produces just enough for baby to share with mummy and daddy - simply increase the quantities for bigger appetites or if your family is larger.
2 slices of whole wheat bread
1/2 dessert apple, peeled, cored and thinly sliced (we used Golden delicious)
2 eggs
2 tbsp whole milk (can also be made with breast milk or formula if you prefer)
1 small, ripe banana
1 tbsp raisins*
pinch ground ginger (optional)
1/2 tsp vanilla extract
1/2 dessert apple, peeled, cored and thinly sliced (we used Golden delicious)
2 eggs
2 tbsp whole milk (can also be made with breast milk or formula if you prefer)
1 small, ripe banana
1 tbsp raisins*
pinch ground ginger (optional)
1/2 tsp vanilla extract
*The raisins, even when soft from cooking, may be hard for younger babies to manage. Either leave them out, soften them by soaking in warm water for half an hour and add them to the blender when pureeing the other ingredients, or simply pick them out of your baby's portion when serving.
Remove the crusts from the bread, then cut each slice of bread into 4 triangles.
 Grease a small oven proof dish, then layer four triangles of the triangles along the bottom (as shown).
Top the bread with the sliced apple. Sprinkle the apple with the ginger and half of the raisins.
Arrange the rest of the bread triangles on top of the apple.
Blend together the eggs, milk, banana and vanilla (we used our food processor for this).
Pour the mixture over the bread triangles very carefully, so that all of the bread is thoroughly moistened.
Sprinkle with the raisins, then transfer to the fridge and leave for AT LEAST half an hour. If we're serving this for breakfast, we leave it to soak overnight, to make sure that the bread soaks up all the liquid and is really nice and soft!
To cook, preheat the oven to 325 deg F.
Place the dish in the oven and bake for 30 to 40 mins. When ready, the eggs should be set and the top should be pale gold in colour.
Cool to a safe temperature, serve -and marvel over how good a dessert can taste with no sugar!
Refrigerate or freeze any leftovers - the pudding will keep for up to one month in the freezer.
Note: If the apple is a little more than baby can manage, you can either mash it thoroughly OR use homemade applesauce in place of the sliced apple.
Thursday, April 5, 2012
My Sweet Thursday
I have a sweet tooth and always craving for just anything that's sweet. Cupcake + chocolate is just what I need to give Thursday a boost to keep me through da week before weekend arrives. Gee, I'm sooooo looking forward to weekends...

Chocolate Cupcakes
(makes 24-27 standard sized cupcakes)
2 cups sugar
1 3/4 cups all purpose flour
3/4 cup unsweetened cocoa (best quality available)
1 1/2 teaspoons baking powder
1 1/2 teaspoons baking soda
1 teaspoon salt
3 eggs
1 cup whole milk
1/2 cup vegetable oil
2 teaspoons vanilla extract (best quality available)
3/4 cup boiling water
Directions-
1. Line muffin tin with paper liners. Heat oven to 350*F.
2. In a large mixing bowl, stir together sugar, flour, cocoa, baking powder, baking soda and salt.
3. Add eggs, milk, oil and vanilla. Beat on medium speed for one minute.
4. Stir in boiling water (the batter will be thin, don't worry, this is right).
5. Fill liners 2/3 full with batter. (I usually put the batter into a large measuring cup with a pour spout, and then pour the batter into the liners.)
6. Bake cupcakes for approximately 22-24 minutes.
7. Cool completely on wire rack before frosting.
Recipe source- Adjusted slightly from Hersheys.
Marshmallow Frosting
2 (large) egg whites
1 cup sugar
6 Tablespoons water
1 Tablespoon light corn syrup
1/2 teaspoon cream of tartar
1/4 teaspoon salt
1 cup miniature marshmallows
1 teaspoon vanilla extract
Directions-
1. In a large heatproof bowl (the metal bowl of your electric mixer), combine the egg whites, sugar, water, corn syrup, cream of tartar and salt.
2. Set the bowl over (but not touching) simmering water in a saucepan and heat mixture, stirring constantly until the sugar has dissolved and the mixture is very warm to the touch (about 160*F), about 3 minutes.
3. Remove the bowl from the saucepan. Using an electric mixer, beat on medium-high speed, about 2 minutes.
4. In a small bowl, microwave 1 cup mini marshmallows 30 seconds to 1 minute, until puffed, and starting to melt.
5. Add marshmallows to mixture in electric mixer, reduce speed to low and add vanilla. Continue beating (on low) until the marshmallows are melted and frosting is completely smooth (about 3-4 minutes). Use frosting right away.
Sunday, April 1, 2012


Friday, October 28, 2011
Chocolate Graham Cracker Cupcakes with Toasted Marshmallow

Ingredients
2 1/4 cups plus 2 tablespoons sugar
1 3/4 cups all-purpose flour
3/4 cup plus 1 tablespoon cocoa powder (not Dutch-processed)
1 1/2 teaspoons baking powder
1 1/2 teaspoons baking soda
1 teaspoon salt
2 large eggs
1 cup whole milk
1/2 cup vegetable oil
2 teaspoons pure vanilla extract
1 cup boiling water
1 1/2 cups graham cracker crumbs (from about 20 squares)
1/3 cup unsalted butter, melted
9 ounces bittersweet chocolate, finely chopped
Marshmallow Frosting
Directions
1.Preheat oven to 350 degrees. Line 2 standard muffin tins with cupcake liners; set aside.
2.Sift 2 cups plus 2 tablespoons sugar, flour, cocoa powder, baking powder, baking soda, and salt together into the bowl of an electric mixer. Using the paddle attachment, mix ingredients together on low speed.
3.In a large bowl, mix together eggs, milk, oil, and vanilla. Add to flour mixture and beat on medium speed for 30 seconds. Scrape down sides of bowl and continue mixing on medium speed for 2 minutes. Add boiling water and stir to combine; set cake batter aside.
4.Place graham cracker crumbs, remaining 1/4 cup sugar, and melted butter in a large bowl; stir until well combined.
5.Place 1 tablespoon graham cracker mixture into the bottom of each prepared muffin cup. Use the bottom of a small glass to pack crumbs into the bottom of each cupcake liner. Reserve remaining graham cracker mixture for topping.
6.Place 2 teaspoons chocolate in each muffin cup. Transfer muffin tins to oven and bake until the edges of the graham cracker mixture is golden, about 5 minutes. Remove from oven and fill each muffin cup three-quarters full with cake batter. Sprinkle each with remaining chocolate and graham cracker mixture. Return to oven and bake, rotating pans halfway through baking, until tops are firm and a cake tester inserted in the center comes out clean, 18 to 20 minutes. Transfer muffin tins to a wire rack and let cupcakes cool in pan for 10 minutes. Remove cupcakes from pan and let cool completely.
7.Transfer frosting to a large pastry bag fitted with a large plain round or French tip (such as Ateco #867 or Ateco #809). Pipe frosting in a spiral motion on each cupcake. Transfer cupcakes to a baking sheet. Using a kitchen torch, lightly brown the frosting, taking care not to burn the cupcake liners. Serve immediately or store in an airtight container, up to 2 days.
http://www.marthastewart.com/332838/chocolate-graham-cracker-cupcakes-with-t
Sunday, May 8, 2011
My 1st Unofficial Mother's Day
This year is my first unofficial Mother's Day and hubby has agreed to celebrate this meaningful day with me.
Initially, hubby had planned to bring me out for a nice and romantic dinner, but our afternoon nap( 'thanks' to the morning shopping what we both were toooooo exhausted and desperately needed a quick nap before dinner) took a longer time than we planned. Guess what!! We overslept and woke up at 9pm instead!!! So our nice and romantic dinner turned out to be.....
 Hubby's homecooked Pasta Carbonara and Mixed Green Salad with Thousand Island dressing.....
 Yummy......
Initially, hubby had planned to bring me out for a nice and romantic dinner, but our afternoon nap( 'thanks' to the morning shopping what we both were toooooo exhausted and desperately needed a quick nap before dinner) took a longer time than we planned. Guess what!! We overslept and woke up at 9pm instead!!! So our nice and romantic dinner turned out to be.....
 Hubby's homecooked Pasta Carbonara and Mixed Green Salad with Thousand Island dressing.....
 Yummy......
P/S: Can't wait to celebrate Mother's Day with my beloved baby next year......
~~~~~~~~~~~~~~~~~~~~~~~~
Dear mummy and mum-in-law,
Happy Mother's Day and
I Love you...
Love.
~~~~~~~~~~~~~~~~~~~~~~~~
Dear mummy and mum-in-law,
Happy Mother's Day and
I Love you...
Love.
Friday, March 25, 2011
Hubby's LunchBox Journal 2
This is the 2nd week that I've been preparing lunchbox for hubby to bring to office. Thumps up and a big clap for my effort!!(*ahem!)
Monday:-
Main: Herbal chicken soup with noodles
Snack: cheese & crackers
Drink: Herbal drink
Tuesday:-
Main: Sausage, Egg and Cheese double decker sandwich
Snack: mixed dried fruits
Drink: Herbal drink
Wednesday:-
Main: Sausage, Egg and Cheese double decker sandwich (back by popular demand, wuahahaha...)
Snack: cheese & crackers
Drink: Herbal drink
Thursday:-
Main: Ginseng herbal chicken soup with rice
Snack: 3 pieces of Macau seaweed chicken floss biscuits
Drink: Chrysanthemum drink
Friday:-
Declared off day! Was having bad gastric the night before and slight discomfort this morning......
Monday:-
Main: Herbal chicken soup with noodles
Snack: cheese & crackers
Drink: Herbal drink
Tuesday:-
Main: Sausage, Egg and Cheese double decker sandwich
Snack: mixed dried fruits
Drink: Herbal drink
Wednesday:-
Main: Sausage, Egg and Cheese double decker sandwich (back by popular demand, wuahahaha...)
Snack: cheese & crackers
Drink: Herbal drink
Thursday:-
Main: Ginseng herbal chicken soup with rice
Snack: 3 pieces of Macau seaweed chicken floss biscuits
Drink: Chrysanthemum drink
Friday:-
Declared off day! Was having bad gastric the night before and slight discomfort this morning......
Friday, March 18, 2011
Hubby's LunchBox Journal
Since hubby is not feeling well this week, I've been waking up early and preparing lunch box for him to bring to office throughout this week..
Monday:-
Main course: Red dates and wolfberries porridge
Side: Cucumber and cherry tomato salad
Fruit: red grapes and strawberry
Drink: home cooked chrysanthemum drink
Tuesday:-
Main course: carrot and chicken porridge
Side: pan fried sausage with eggs
Fruit: red grapes and strawberry
Drink: home cooked chrysanthemum drink
Wednesday:-
Main course: carrot and chicken porridge again(hubby likes it....)
Side: sausages and fried egg
Fruit: pear
Drink: home cooked chrysanthemum drink
Thursday:-
Main course: carrot and chicken porridge again....(hubby requested for that again!)
Side: stir fried ginger chicken with a dash of Shaoxing wine
Fruit: red grapes and strawberry
Drink: home cooked chrysanthemum drink
Friday:-
Main course: chicken porridge
Side: stir fried tomato chicken and egg
Fruit: mixed dried fruits
Drink: home cooked chrysanthemum drink
Well, it's definately not easy to be a good wife and a good chef huh!!
Monday:-
Main course: Red dates and wolfberries porridge
Side: Cucumber and cherry tomato salad
Fruit: red grapes and strawberry
Drink: home cooked chrysanthemum drink
Tuesday:-
Main course: carrot and chicken porridge
Side: pan fried sausage with eggs
Fruit: red grapes and strawberry
Drink: home cooked chrysanthemum drink
Wednesday:-
Main course: carrot and chicken porridge again(hubby likes it....)
Side: sausages and fried egg
Fruit: pear
Drink: home cooked chrysanthemum drink
Thursday:-
Main course: carrot and chicken porridge again....(hubby requested for that again!)
Side: stir fried ginger chicken with a dash of Shaoxing wine
Fruit: red grapes and strawberry
Drink: home cooked chrysanthemum drink
Friday:-
Main course: chicken porridge
Side: stir fried tomato chicken and egg
Fruit: mixed dried fruits
Drink: home cooked chrysanthemum drink
Well, it's definately not easy to be a good wife and a good chef huh!!
Monday, April 13, 2009
ToP 10 TipP FoR BaKiNg A PeRf3Ct CuPcAkEs
 10 Tips for Baking a Perfect Cupcake
Follow these tips for baking perfect cupcake treats for your friends and family.
1. Fill your cupcake wells 1/2 to 2/3 full. Any more and you will get a gooey mess instead of a beautiful cupcake. If you use less than 1/2 a well of batter, then you will get wimpy cupcakes and will have to use extra frosting to make them look larger.
2. Choose the right cupcake pan. Good cupcake pans are shiny and on the heavy side. They will cook 6 to 12 cupcakes at a time. Large muffin pans don't work well for baking precious little cupcakes. Make sure you have 2 pans available because then you won't have to cool a pan before you finish baking your cupcakes. Two 12 well cupcake pans should be enough for one batch of cupcakes.
 3. Make it easy o remove the cupcakes from your pan. Either use paper or foil wrappers or spray the individual wells with a nonstick spray. If you are using the new silicone pans, wrappers or nonstick spray work fine in these also.
4. Don't overmix your batter. This will cause your cupcakes to be rather chewy instead of perfectly moist. Follow the directions in your cupcake recipe. If your recipe calls for a hand mixer and you are using a stand mixer, you will need to reduce you mixing time. Stand mixers mix batters faster than regular hand mixers. Consult your owners manual for mixing time adjustments.
5. Bring all ingredients to room temperature before mixing your cupcake batter. The items will mix evenly, and the result will be a wonderful cupcake batter. By mixing cold items into your batter, you risk having a lumpy batter which might cause you to overmix your batter. GASP! What a No No!
6. Bake your cupcakes at the proper temperature. Preheat your oven to the correct temperature BEFORE you put your cupcakes in the oven. An oven thermometer would also be a great idea to make sure your oven is set to the right temperature. If your oven cooks food faster at the rear of the oven, then make sure you rotate your cupcake pan halfway through the baking time.
7. Use your favorite cake batter to make cupcakes. Batter for an 8 inch layer cake usually makes 20-24 cupcakes. Just make sure you have mixed the batter well, and only fill the cupcake liners 1/2 to 2/3 full. Bake approximately 20 minutes, and check for doneness using a toothpick or cake tester inserted into the center of the cupcakes.
 8. Test for doneness after the minimum cooking time. If the cupcakes aren't finished cooking after the minimum time, then place them back in the oven for some additional cooking time. Cupcakes are done when a toothpick inserted in the center comes out clean.
9. Cook only one pan of cupcakes at a time. Place your cupcake pan in the very center of your oven. If your oven tends to cook items more that are towards the back, then rotate your cupcake pan halfway through the cooking time. If you absolutely have to bake 2 pans of cupcakes at one time, make sure you switch cupcake pans halfway through the cooking time. By this I mean put the bottom pan on the top and move the top pan to the bottom.
10. Cupcakes are best eaten the same day they are made. Undecorated cupcakes can be frozen up to 3 months.
Why don't you bake your favorite cupcakes now? Enjoy one as soon as it's ready and then either share the rest with friends or freeze them for your future enjoyment!
Saturday, March 21, 2009
Chi3f CoOk
Help.......I was soooooooo hungry, so did my bf!! He suddenly felt like eating his all-time favourite dish when he was staying in Perth-- Fatt San Chicken! Couldnt find it anywhere in Malaysia(that's what he said'lah'!!).
So he decided to be the chef of the night with the limited ingredient we could find from the hypermarket before headed back home to start our big task...
Since bf was in the mood to be the chief chef, I just sat down and blog a bit while waiting for a sumptious meal. Bf in action~~Chef Of The Nite!!
Bf in action~~Chef Of The Nite!!
In the midst of preparing......Gee, I was starving!!!!!Roti Canai Satu please while waiting for the chicky meal....
Tahhhhh tahh.......Finally, dinner was ready!!!! Eeyy, I finally discovered the desperate house'husband' every gals would die to have....Guess I don't have to worry about cooking next time, since he's good at it too...*~*Hint, Hint to bf! Don't ask me to cook everyday after married, please!! FYI, I'm not your maid ah!) :P

Bf's final piece.....
 Fatt San Chicken with fried eggs...Yummy!!!!
I'll give it a 10!!! Keep it up, my dear!! Hehehehe......
Subscribe to:
Posts (Atom)
LinkWithin
